Deform Graph Mesh Proxy
发布于:2024-11-21
Function Description
In the presence of the following assets:
- Character base model skeleton mesh
- Character skeleton mesh with clothing (high-poly model)
The DeformerGraph process can streamline the workflow by eliminating the need for high-poly model unwrapping, material modification, and re-skinning after splitting the high-poly model.
For non-DeformerGraph mesh proxies, it's necessary to split out the high-poly model for clothing simulation and for use as collision bodies.
After splitting the high-poly model, the UV topology is disrupted, requiring the creation of new materials for the high-poly model.
After splitting the high-poly model, manual re-skinning of the high-poly model used as collision bodies is required.
The DeformerGraph process also offers higher performance advantages compared to non-DeformerGraph mesh proxies.
Usage Steps
1. Preparation
● UE version >= 5.2
● Style3D plugin (V2.1.0) installed, along with the following plugins:
.webp?alt=media&token=0acaf7b4-dfc0-4133-ab39-949a646c3698)
● Character Assets:
Collision bodies (meshes excluding fabrics) | High-poly characters with clothing | Clothing simulation meshes |
|---|---|---|
.webp?alt=media&token=8c9ae0c7-f477-4380-b2cf-0a60383ea396) | .webp?alt=media&token=838f2b68-e998-43fa-b278-98f8eb4bfa8e) | .webp?alt=media&token=f10916ab-4d71-4044-b8c6-eec8b15ad709) |
● Can be nude models ● Can include armor, weapons, accessories, etc., which will also collide with fabrics during simulation | ● Complete character high-poly model ● Includes all renderable parts such as clothing, accessories, etc. | ● Select the clothing parts to be simulated from the high-poly model, remove detailed topology such as surface wrinkles, and obtain cloth pieces for simulation. |
2. Character Component Structure
.webp?alt=media&token=990434dc-0c39-4f01-933e-416314aee333)
Component | Configured Model | Functionality |
|---|---|---|
| Collision body for garments (naked model, or with additional collision parts) | Collision with parts of garments, receives input from character animations |
| Complete high-poly character | Rendering display |
| Clothing solver mesh | Cloth simulation |
3.Main Skeleton Mesh
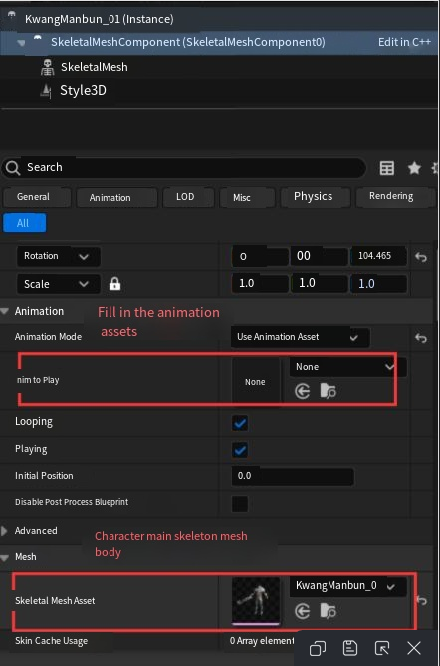
- Sub SkeletalMesh Components Animation Blueprint

● Create Animation Blueprint
.webp?alt=media&token=6a49062b-3cb0-484a-b1aa-d18d608095e5)
Animation Blueprint Setup
.webp?alt=media&token=b7465676-7ea8-4de7-ac0e-382eb9411b38)
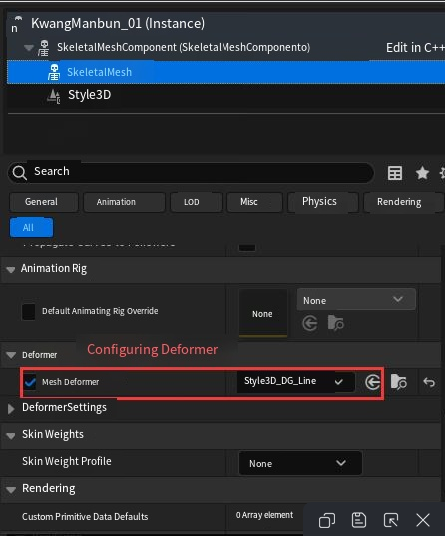
● Configure Deformer
4. Style3D Component
.webp?alt=media&token=9faba386-7dba-4e51-9028-b649f305a18a)
Setting up Patch Skinning Blend
● Attach patches by setting up skinning blend for patches
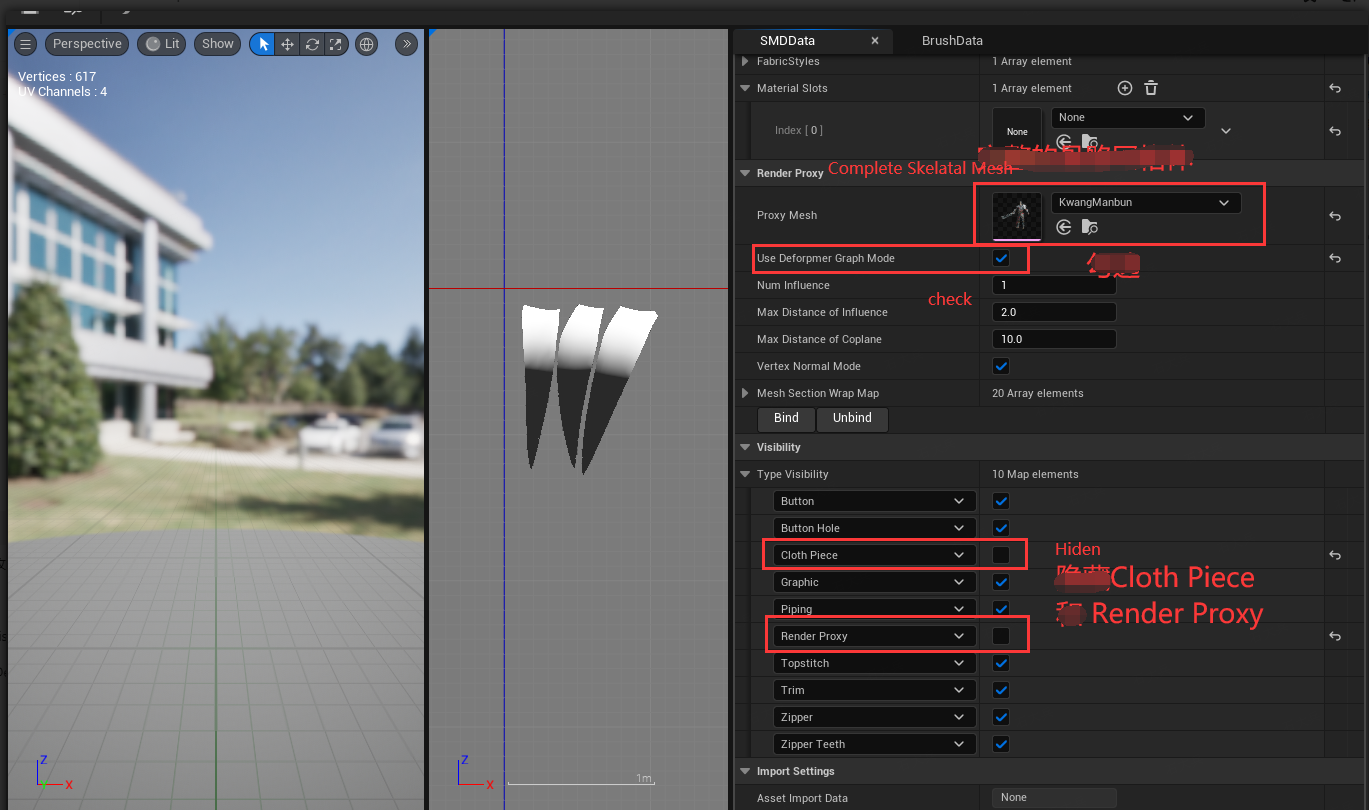
Setting up Mesh Proxy
● Configure full skeletal mesh in Clothing Rendering Proxy (consistent with Sub SkeletalMesh Components above)
● Operations for Mesh Proxy: Bind -> Modify Proxy Relationships
Setting up Deformer Graph Mode
● Check Use Deformer Graph Mode, Remove Mesh Section Wrapmap Index Groups Without Calculated Meshes,then click Bind again
● Hide Cloth Piece and Render Proxy
● Save
- Run in Editor Add different animation assets under the main skeleton mesh and observe the effects.
